Why Cook Pickles This Way?

Refrigerator dill pickles offer a crisp, tangy flavor that perfectly complements sandwiches, burgers, or simply enjoyed as a refreshing snack. Unlike traditional canning methods, this approach is quick and easy, yielding pickles that retain their vibrant color and satisfying crunch. The key is a simple brine infused with dill, garlic, and spices that transforms ordinary cucumbers into a flavorful delight in just a few days.
This method focuses on fresh, unfermented pickles, relying on the acidity of vinegar to inhibit spoilage while preserving the cucumbers' natural crispness. By skipping the high-heat canning process, you'll achieve a brighter flavor and a more pronounced crunch, making these pickles a standout addition to any meal. These pickles have a strong dill and garlic flavor with a little bit of bite from the red pepper flakes.
Understanding Cucumbers for Pickling
Not all cucumbers are created equal when it comes to pickling. The best varieties are those with firm flesh, minimal seeds, and a relatively uniform shape. Kirby cucumbers, known for their bumpy skin and crisp texture, are a top choice. Persian cucumbers, with their thin skin and mild flavor, also work well. Avoid larger, waxier cucumbers, as they tend to become soft and mushy during the pickling process. Look for cucumbers that are firm to the touch and free from blemishes or soft spots.
Why Cook Pickles This Way?
- Versatility: Enjoy them straight from the jar, chop them into salads, or use them as a topping for burgers and sandwiches.
- Flavor: The fresh dill, garlic, and vinegar brine create a bright, tangy flavor that surpasses store-bought options.
- Convenience: This refrigerator method requires no special equipment or canning experience, making it a simple and accessible project for home cooks.
Preparation (Mise en Place)
- Cucumbers: Wash cucumbers thoroughly and trim about 1/16 inch off both ends. Cutting off the blossom end is especially important, as it contains enzymes that can soften the pickles. Slice into spears, coins, or leave whole, depending on preference.
Essential Tools:
- Chef's Knife: A sharp chef's knife ensures clean, even cuts when slicing cucumbers.
- Cutting Board: Provides a stable and sanitary surface for prepping ingredients.
- Pint Jars (2): Wide-mouth pint jars are ideal for easy packing and removal of pickles. Sterilize before use to ensure food safety.
- Small Saucepan: Used to heat the brine, allowing the salt and sugar to dissolve completely.
The Cooking Method
How to Make Refrigerator Dill Pickles
This method results in crisp, flavorful pickles that are ready to enjoy in just a few days. The key is to pack the cucumbers tightly in sterilized jars and pour a hot brine over them, ensuring they are fully submerged.
Method 1: Refrigerator Dill Pickles
Yields: 2 pint jars
Prep time: 15 minutes
Resting time: 48 hours
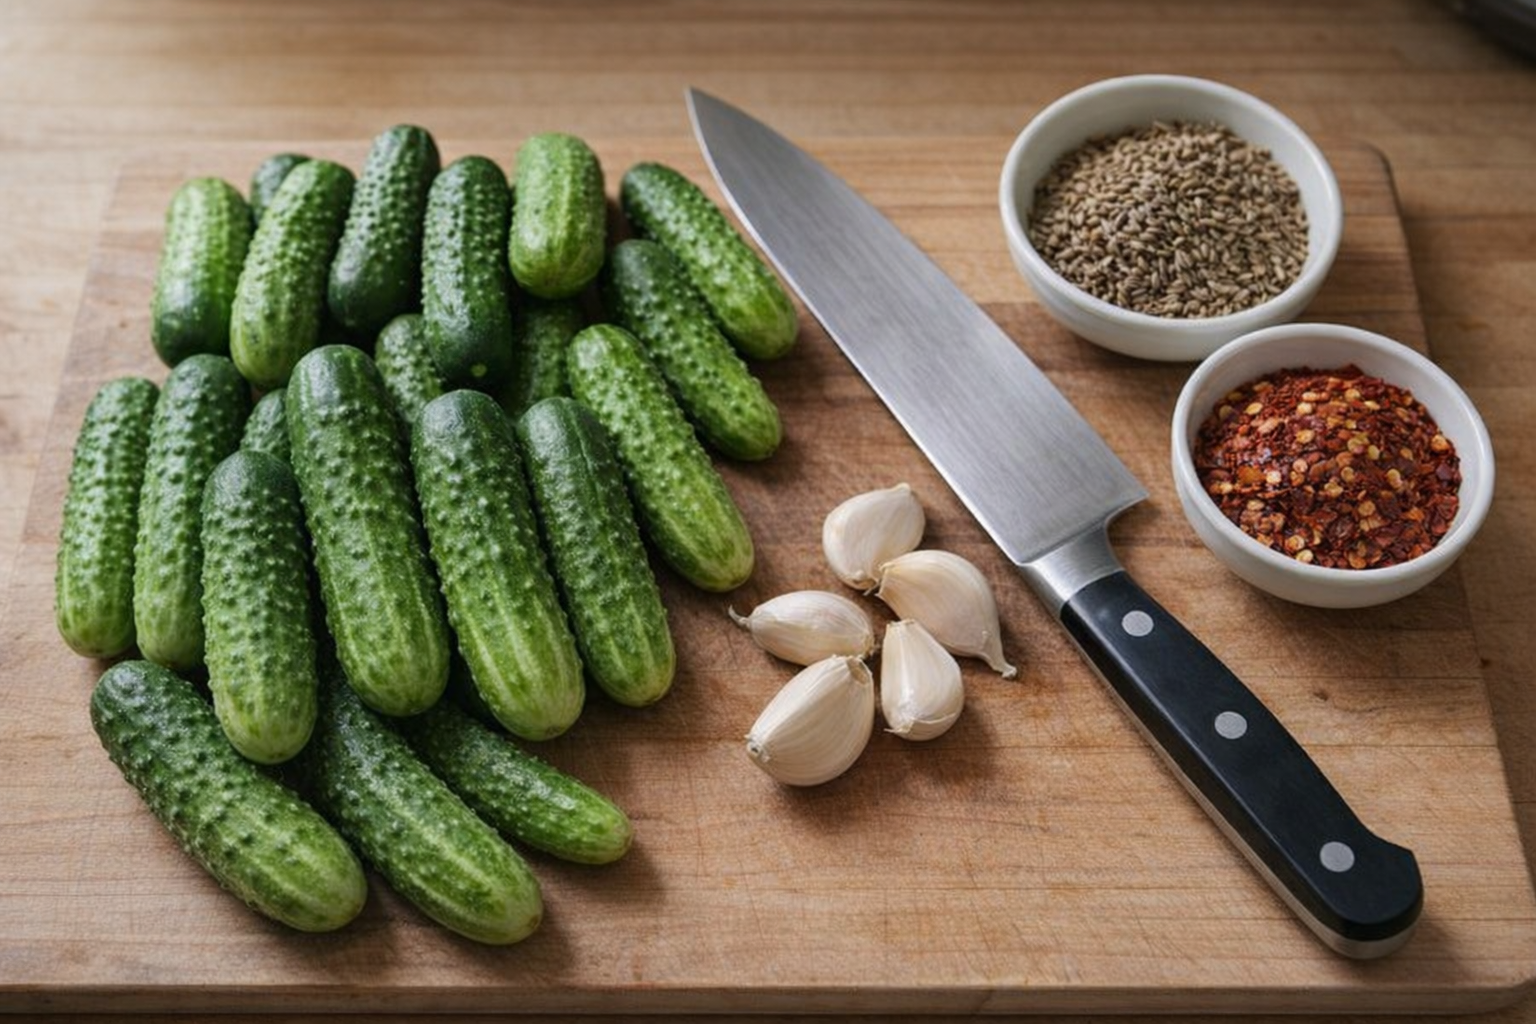
Ingredients:- 1 1/2 pounds Kirby or Persian cucumbers, washed and sliced
- 2 teaspoons dill seeds
- 4 cloves garlic, peeled and crushed
- 1/2 teaspoon red pepper flakes (optional)
- 1 cup apple cider vinegar (240ml)
- 1 cup water (240ml)
- 4 teaspoons pickling salt or kosher salt
- Prepare Jars: Sterilize two pint jars and their lids by boiling them in water for 10 minutes. Remove and let air dry. The clean, hot glass will help prevent bacteria growth.
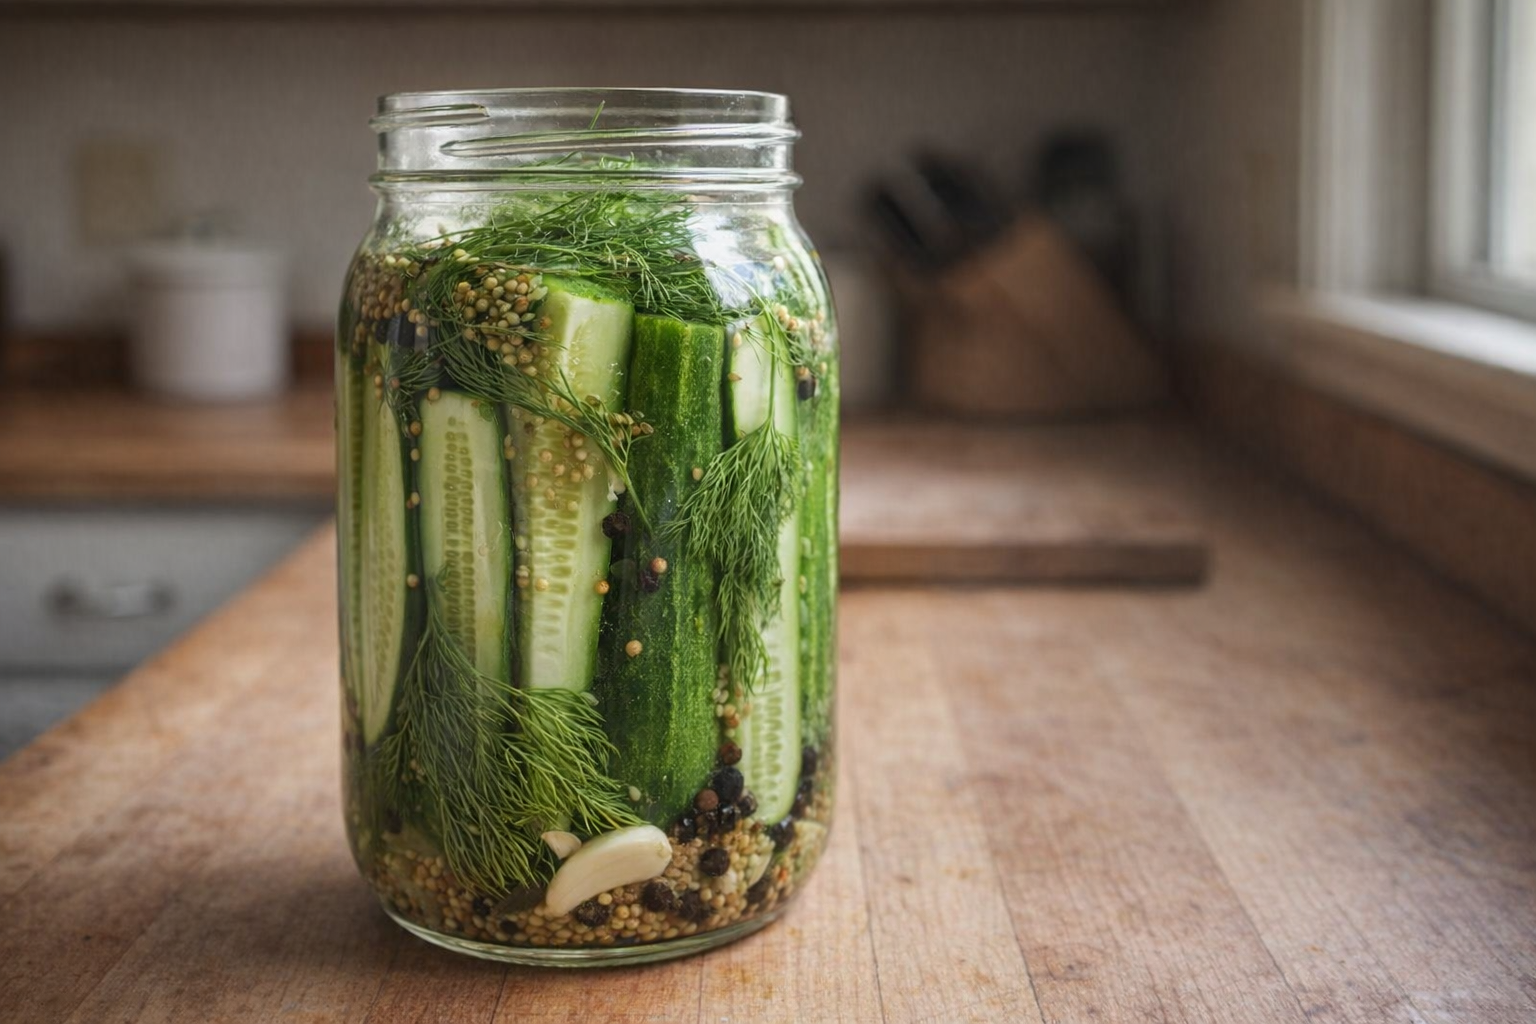
- Add Spices: Evenly distribute the dill seeds, crushed garlic cloves, and red pepper flakes (if using) between the two jars. The aroma of garlic fills the air, indicating the release of its potent flavor compounds.
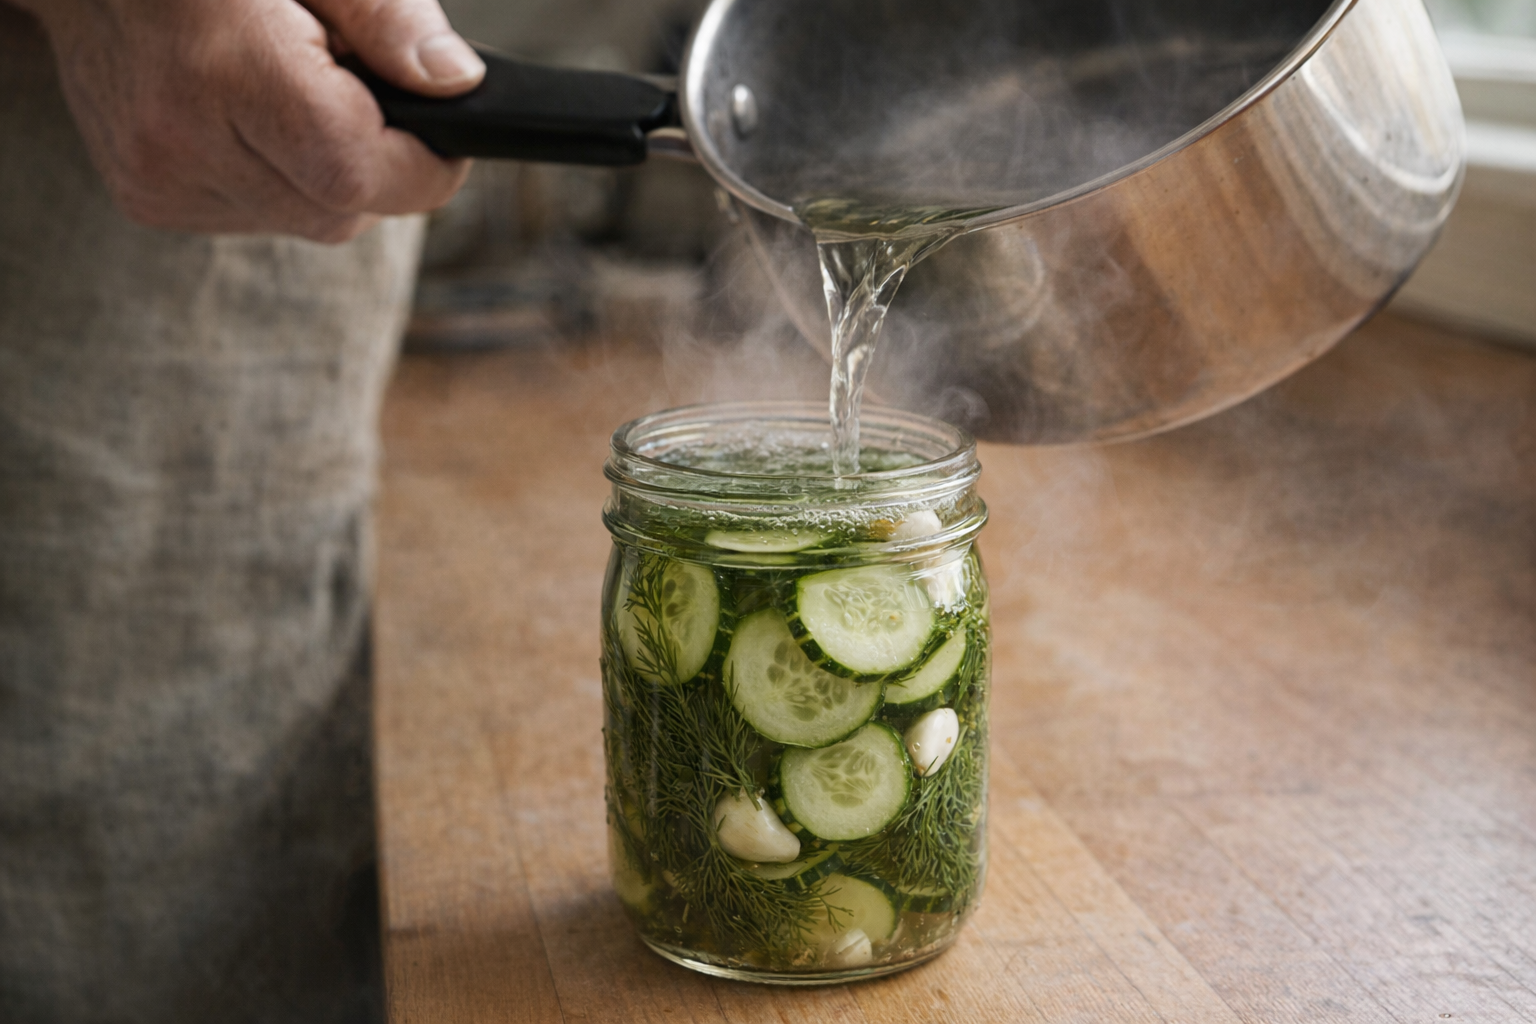
- Pack Cucumbers: Tightly pack the sliced cucumbers into the jars, leaving about 1/2 inch of headspace at the top. The cucumbers should be snug, but not crushed, to ensure even brining.
- Make Brine: In a saucepan, combine the apple cider vinegar, water, and salt. Bring to a boil over medium heat, stirring until the salt is completely dissolved. The hot vinegar mixture carries the salt, ensuring every part of the pickle tastes balanced.
- Pour Brine: Carefully pour the hot brine over the cucumbers in the jars, ensuring they are fully submerged. Leave about 1/2 inch of headspace at the top. As the hot brine hits the cool cucumbers, you'll hear a slight sizzle, indicating the start of the pickling process.
- Remove Air Bubbles: Gently tap the jars on the counter to release any trapped air bubbles. Use a clean utensil to push the cucumbers down, if necessary, ensuring they remain submerged.
- Seal and Cool: Place the lids on the jars and screw on the rings. Let the jars cool to room temperature. You may hear a "popping" sound as the lids seal, indicating a successful vacuum.
- Refrigerate: Once cooled, refrigerate the pickles for at least 48 hours before eating. The longer they sit, the more the flavors will develop. Taste the pickles after 48 hours, noting the balance of sour, salty, and spicy.
Cooking Time & Doneness Guide
- Resting Time: Minimum 48 hours in the refrigerator.
- Visual Cues: The cucumbers will change from a bright green to a more muted, olive-green color as they absorb the brine. The brine itself will become slightly cloudy as the pickling process progresses.
Tips for Perfection
- Use Fresh Cucumbers: The fresher the cucumbers, the crisper the pickles. Avoid cucumbers that are soft or have blemishes.
- Pack Tightly: Packing the cucumbers tightly helps prevent them from floating and ensures they are fully submerged in the brine.
- Don't Overfill: Leave enough headspace (about 1/2 inch) to allow for expansion during the pickling process.
- Patience is Key: Resist the temptation to eat the pickles before 48 hours. The flavors need time to develop properly.
Storage & Reheating
Refrigerator dill pickles should be stored in the refrigerator. They will last for up to 2 months. Because these pickles are not canned, they must stay refrigerated. If they sit at room temperature, they will spoil.
Serving Suggestions
- Classic Sandwich Accompaniment: Serve alongside your favorite sandwiches or burgers for a tangy crunch.
- Deli Platter Addition: Add sliced pickles to a charcuterie board or deli platter for a flavorful contrast to cured meats and cheeses.
- Salad Topping: Chop pickles and add them to potato salad, tuna salad, or coleslaw for a zesty kick.
- Snacking: Enjoy them straight from the jar as a refreshing and low-calorie snack.
Frequently Asked Questions
Absolutely! Feel free to customize the brine with your favorite spices. Mustard seeds, coriander seeds, or even a bay leaf can add unique flavor dimensions to your pickles. Just be sure not to overpower the dill and garlic, which are essential to the classic dill pickle flavor.
Refrigerator pickles will generally last for up to 2 months in the refrigerator. Ensure that the cucumbers are fully submerged in the brine and that the jar is tightly sealed to maintain optimal freshness and prevent spoilage. Discard if you notice any signs of mold, discoloration, or an off odor.
Several factors contribute to pickle crunch. First, ensure you're using the right type of cucumber, like Kirby or Persian. Also, be sure to trim the blossom end of the cucumber, as it contains enzymes that can soften the pickles. Some people like to add a grape leaf or a pinch of calcium chloride (pickle crisp) to the jar to help maintain crispness.
While you can use regular white vinegar, white distilled vinegar is preferred for pickling due to its higher acidity level (typically 5%). This higher acidity is crucial for inhibiting bacterial growth and ensuring the safety of your pickles. Using a lower-acidity vinegar might result in pickles that don't last as long or are more prone to spoilage.